
Arrangement of the Atmospheric Vent Water Heaters

● Two, 40 gallon Atmospheric Vent Water Heaters are installed at a home.
● They are combined together in such a way that they work in tandem.
● Cold water supply comes in from one valve which feeds both the heaters and then they both come back out to feed into one single hot water line that supplies the house.
● We need to pipe it in a way such that we have an equal vertical and an equal horizontal run from each heater, for both to work in tandem.
1. Turn gas off by turning the dial to OFF position. The PILOT light can be heard going off. Now, the Water Heater is no longer operating.

2. Hook a drain hose on the bottom of the heater tank. Tighten it up to the o-ring gasket.
3. Open the drain valve with a screwdriver. Initially the slot goes sideways, showing that the water is totally off. Leave full pressure onto the heater while opening the drain valve. Make sure that the hose is secure at the other end. After turning the slot to the vertical position, water will come out rapidly while pushing out any dirt at the bottom.

4. Then, quickly turn the valve off on the top of the heater. After 5 seconds or less of pushing all the sediment out, shut off the water supply to the unit by turning off the main water valve. Let the gravity drain which usually takes about 30 to 40 minutes.
5. After the heater is completely drained, we are going to carry out the rinsing of the bottom. In our water heater there might be a little bit of minerals or dirt composite that came into your house from the city which is sitting at the bottom of the heater. Using the Hydro Jet technology, we can push the debris out of the drain.

6. Since our water heater tank is now completely empty, we are going to turn the water on for about 3 seconds, causing it to swirl at the bottom of the tank and then we’ll turn it off and wait for about 8 or 9 seconds while it completely drains out. Repeat that process two or three times. When we are done, we can put a microscope camera inside the tank to see that it is completely clean with no debris at the bottom of the tank.
7. We now close off the drain valve and remove the hose from the bottom.

8. We are ready to introduce water fully back into the unit and put it back in service. Turn on the main water valve, fill the tank up. It will take about 4 to 5 minutes and the whole house will be recharged with water again.
9. Now, we need to turn the gas back on to the units. To do so, remove the access panel. There is a sightglass for us to know exactly when the gas is lit.

10. Turn the control knob from OFF to PILOT. Push the knob in and click the bottom button 2 or 3 times, which will release the gas to the pilot. You can look through the sightglass to verify that the pilot is lit. If you see a blue flame in there, the pilot is ready to go.

11. Within 20 seconds, you’ll hear an audible click and see a green status light start flashing at the led which tells us that it is ready.

12. Now we can move it back to the HOT position which is at 120℃. If we want our water to be hotter then every notch from HOT to A, A to B, B to C, C to VERY HOT is 10℃.
13. After lightning the pilot, replace the access panel and the Water Heater is back in service.

Please give us a message
DINGXIN story
One electric water heater branded as Dingxin, which has warmed Mr Chen for 22 years. In 1991,Mr Chen bought a new water heater and normally lived with it as long as 22 years in Wenzhou
The Family business
DINXIN ADVENTURE THROUGH 2 GENERATIONS, FROM THE START IN 1986 TO TODAY.
The family business
The founder –Dong Wanwen– started “Dingxin” (in Wenzhou in 1986, as one of the first water heater manufacture in China. With minimal resources he created the first vented water heater in Wenzhou. He has, during his 30 years in Dingxin, mixed friendly industry and home culture in a unique way and has given Dingxin the recognition as one of the earliest enterprises in china.
2rd generation –Eric Dong,is devoted to improving Dingxin’s products and processes and desires to build the company brick by brick,. The pioneering spirit lives on with product innovations featuring integrated solutions, ground-breaking material technology and added value for our customers.
Three main markets oriention of Dingxin:
• Northern China: Thanks to trust and confidence from our customers, Dingxin engages a attractive market share in North China over the last 30 years. Our products named as Dignxin delivers well-being and hotwater to two-thirds of all homes in the three north-east of provinces of china, with durable lifetime economy.
• OEM/EXPORT: We are proud to supply water heaters to various brands in the heating industry all over Europe,South America,South asia. OEM is an important part of our business because it inspires and motivates us to think innovatively, be flexible in our approach and challenge traditional mind-sets.
• Kitchen&bathroom branch: Dingxin focuses on the domestic market of kitchen&bathroom since 2016 and whose sales make up about 40% of the turnover and gives us a unique perspective and knowledge of related business lines and innovative marketing strategies which benefit all our customers.
DINGXIN story
One electric water heater branded as Dingxin, which has warmed Mr Chen for 22 years. In 1991,Mr Chen bought a new water heater and normally lived with it as long as 22 years in Wenzhou
Historic milestones
Dingxin launched a promise to replace the water heaters free of charge for those were purchased before 1995 and still normally used up to 2015. When Mr. Zhang saw this news,he immediately rushed to the Dingxin franchise shop of department store in Taiyuan city, Shanxi province. the Dingxin staff there offered Mr. Zhang for a free replacement service;
One electric water heater branded as Dingxin, which has warmed Mr Chen for 22 years. In 1991,Mr Chen bought a new water heater and normally lived with it as long as 22 years in Wenzhou .when Dingxin launched a campaign that every home could receive new water heater replacement installation service free of charge only if who purchased Dinxin water heaters before 1995 and still normally adopt it with over 22 years, Surely Mr Chen belongs to the ones who could received this fantastic service launched by Dingxin.
Mr. Zhu, in Dingxin franchise department, purchased two electric water heaters in 1988 and he spent ¥500 in all. When it comes to 2014, the two electric water heaters have been in its life time for 26 years and still have been in fantastic condition. The Dingxin promise to offer free replacement service of the two water heaters
In 1993, Mr. Wang purchased this water heater in franchise department of Tangshan city, Hebei province.and it is well in circulation for over 23 years, Dingxin offer free replacement service out of security considerations in 2015
Warranty Information
Dingxin warrants for 2 years from the date of purchase, that the Product will: i) conform to Dingxin approval specification, ii) be free from defects in materials and workmanship, subject to conditions below. All electric components carry a 2-year warranty
Scope
Dingxin warrants for 2 years from the date of purchase, that the Product will: i) conform to Dingxin approval specification, ii) be free from defects in materials and workmanship, subject to conditions below. All electric components carry a 2-year warranty.
The warranty is voluntarily extended by Dingxin to 5 years for the premium models. This extended warranty only applies to Products purchased by a consumer, that has been installed for private use and that has been distributed by Dingxin or by a distributor where the Products have been originally sold by Dingxin.
The extended warranty does not apply to Products purchased by commercial entities or for Products that have been installed for commercial use. These shall be subject only to the mandatory provisions of the law. The conditions and limitations set out below shall apply.
Warranty Information
Dingxin warrants for 2 years from the date of purchase, that the Product will: i) conform to Dingxin approval specification, ii) be free from defects in materials and workmanship, subject to conditions below. All electric components carry a 2-year warranty
Coverage
If a defect arises and a valid claim is received within the statutory warranty period, at its option and to the extent permitted by law, Dingxin shall either; i) repair the defect, or; ii) replace the product with a product that is identical or similar in function, or; iii) refund the purchase price.
Dingxin possess all property of any exchanged Product or component. Any valid claim or service does not extend the original warranty. The replacement received Product or part does not carry a new warranty.
Manufacturing
Excellent working condition & longer service life: no leakage, rust-free, high strength and strong resistance to corrosion
Tank comparison
COMPARISION BETWEEN SS TANK AND ENAMEL TANK
ENAMEL TANK
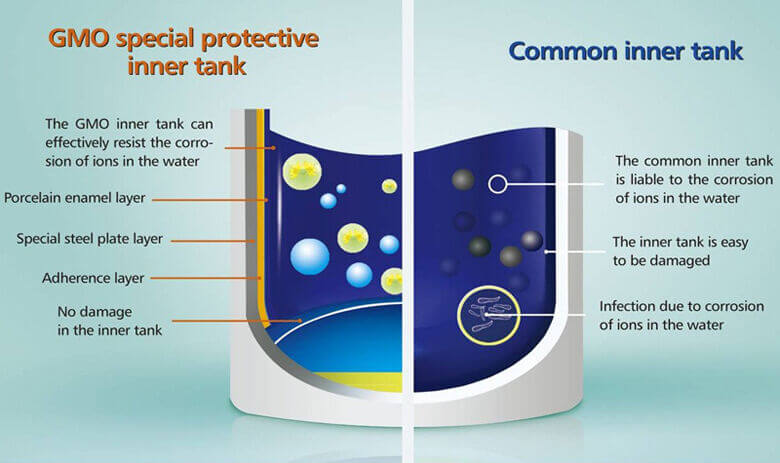
Porcelain Enamel Tank - is a trusted & proven technology for inner tank of water heaters. Used widely across the world, it is ideal for long life & trouble free performance in all kinds of water. More than 95% of water heaters produced worldwide are with enamel tanks. Corrosion protection is very good due to fusion of glass layer to metal.
SS TANK
Stainless Steel Tank - this is an outdated technology that manufacturers are moving out of now. Corrosion protection is very poor, particularly in hard water and due to poor welding quality.
SL Description Enamel Tank SS Tank
1 Protection Coating Porcelain Enamel -
2 Coating Type Inorganic None
3 Coating Thickness 250 - 400 microns None
4 Coating Adhesion Fused with metal None
5 Baking Temperature 850 deg C -
6 Life of the Coating Long life -
7 Usage Widely used Internationally Limited. In very few countries
8 Material Mild Steel Stainless Steel
9 Thickness 2.0mm 0.63
10 Rated Pressure 8kg/cm2 3kg/cm2 & 6kg/cm2
11 cathodic protection Magnesium Anode -
12 Hard water Suitability Good Poor
13 Corrosion Protection V.Good Poor-Average
14 Hot Water resistant V.Good V.Good
15 Approved Quality Standards BIS, IEC, DIN & UL BIS
HARD WATRT
As so common problem for millions of households across the country.Hard water means excessive dissolved minerals, specifically calcium and magnesium in tap water various in different countries.
Hard water is a negative impact because of much limescale it brings, Thus, in water heaters the heated hard water forms a scale of limescale deposits on the tank surface and reduces the heat conductivity of heaters sometimes even leading to its breakdown. and this contributes to inefficiency and costly electricity bill . Limescale has been known to increase energy bills by up to 25%.
Efficiency loss chart(limes scale thickness as variable)
Manufacturing
Excellent working condition & longer service life: no leakage, rust-free, high strength and strong resistance to corrosion
Water heater tank
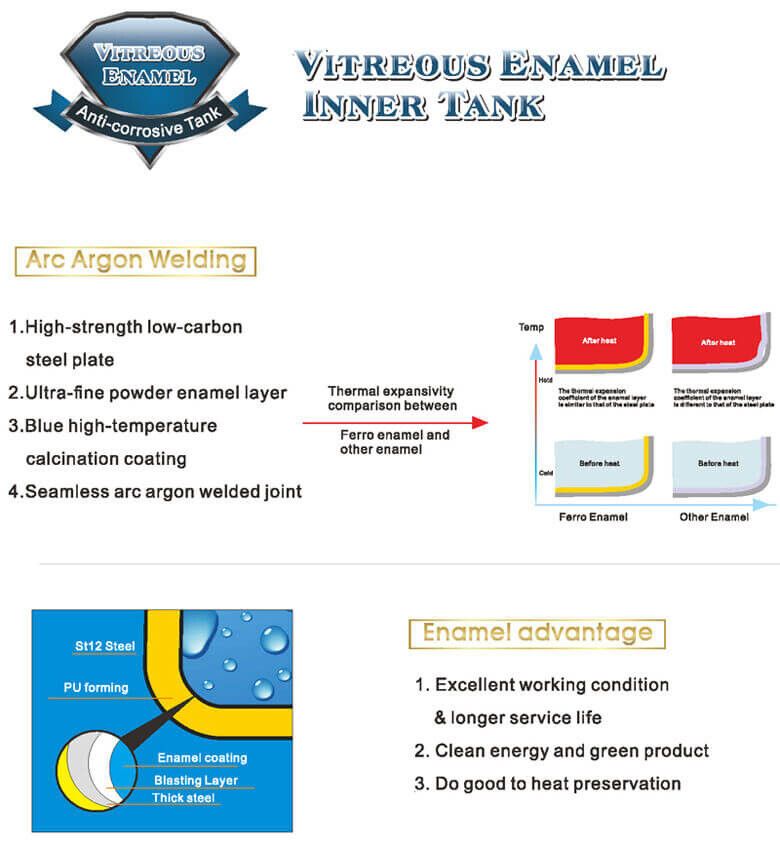
Advantage of Enamel coating water tank:
1. Excellent working condition & longer service life: no leakage, rust-free, high strength and strong resistance to corrosion。
2. Clean energy and green product: no poisonous metal such as plumbum, hydrargyrum and chromium, bring health to your life。
3. Do good to heat preservation
1. Excellent working condition & longer service life
2. Clean energy and green product
3. Do good to heat preservation
Workmanship of enamel water tank:
1. High-strength low-carbon steel plate
2. Ultra-fine powder enamel layer
3. Blue high-temperature calcination coating
4. Three-layer strengthened protection
5. No deformation under 100,000 times impulse test
Downloads
Excellent working condition & longer service life: no leakage, rust-free, high strength and strong resistance to corrosion
Installation and manuals
Downloads
Excellent working condition & longer service life: no leakage, rust-free, high strength and strong resistance to corrosion
Product Catalogue
- Exporting Electric Water Heaters to Africa: Market Insights and Strategies
- Small-Capacity Electric Water Heaters in Africa: Market Preferences Across Key Countries
- How to know the quality of stainless steel electric heating element?
- What are the basic structures of stainless steel electric heating element?
- Let's Take A Look At The Inner Tank Material!
Warranty Information
Dingxin warrants for 2 years from the date of purchase, that the Product will: i) conform to Dingxin approval specification, ii) be free from defects in materials and workmanship, subject to conditions below. All electric components carry a 2-year warranty
Conditions
The Product is manufactured to suit most household water supplies. However, there are certain water chemistries (outlined below) that can have a detrimental effect on the Product and its life expectancy. If there are uncertainties regarding water quality, the local water supply authority can supply the necessary data. The warranty applies only if the conditions set out below are met in full:
• The Product has been installed by a professional installer, in accordance with the instructions in the installation manual and all relevant Codes of Practice and Regulations in force at the time of installation.
• The Product has not been modified in any way, tampered with or subjected to misuse and no factory fitted parts have been removed for unauthorized.
• Any disinfection has been carried out without affecting the Product in any way whatsoever. The Product shall be isolated from any system chlorination.
• The Product has been in regular use from the date of installation. If the Product is not intended to be used for 60 days or more, it must be drained.
• Service and/or repair shall be done according to the installation manual and all relevant codes of practice. Any replacement parts used shall be original DINGXIN i spare parts.
• Any third-party costs associated with any claim has been authorized in advance by DINGXIN in writing.
• The purchase invoice and/or installation invoice, a water sample as well as the defective product is made available to DINGXIN i upon request.
• Failure to follow these instructions and conditions may result in product failure, and water escaping from the Product.
Warranty Information
Dingxin warrants for 2 years from the date of purchase, that the Product will: i) conform to Dingxin approval specification, ii) be free from defects in materials and workmanship, subject to conditions below. All electric components carry a 2-year warranty
Limitations
The warranty does not cover:
• Any fault or costs arising from incorrect installation, incorrect application, lack of regular maintenance in accordance with the installation manual, neglect, accidental or malicious damage, misuse, any alteration, tampering or repair carried out by a non-professional, any fault arising from the tampering with or removal of any factory fitted safety components or measures.
• Any consequential damage or any indirect loss caused by any failure or malfunction of the Product whatsoever.
• Any pipework or any equipment connected to the Product.
• The effects of frost, lightning, voltage variation, lack of water, dry boiling, excess pressure or chlorination procedures.
• The effects of stagnant (de-aerated) water if the Product has been left unused for more than 60 days consecutively.
• Damage caused during transportation. Buyer shall give the carrier notice of such damage.
• Costs arising if the Product is not immediately accessible for servicing.
These warranties do not affect the Buyer’s statutory rights.
FAQ
Q1:How long does the order take?
A:Sample order will be finished within 15 days while normal order will be finished within 25-30 days after receiving deposit,
Q2:What are my WARRANTY OPTIONS on the water heaters you sell?
Dingxin Water Heater Company provides a basic, standard warranty. Our basic warranty is one year for full units or 1% spare parts service.
Q3:Do you accept OEM or ODM orders?
A:Yes, Our R&D team will offer one stop service for you from original idea to finished product.
Q4:What’s the MOQ?
A: Normally MOQ is 1*20 ft container(trial order's quantity is negotiable)
Q5:How can I visit your factory?
A: Sure,Our factory is located in Shaoxing Shengzhou, China, near to Hangzhou Airport and Ningbo Airport .You are always welcome to visit us! We will offer pick up service and free accomodation.
Q6:When can I get the price?
A:Within 24 hours after we get your inquiry.
Q7:Can you offer sample for quality check before order ?
A:Yes , we provide sample service before mass order.
Q8: what other size water heater you have ?
A: We have storage models of 8L\10L\15L\30L\50L\60L\80L\100L\120L\150L,and besides storage model,we also work on instant models,and gas models.
Q9: Can the price be cheaper?
A: Price always follows its quality and we will offer truthful opinion on the marketing strategy on pricing and quality orientation.
Q10: What payment terms?
A: T/T; L/C,West Union or other payment term negotiable
Please give us a message